Archive for August 2015
Scam Web Pages on iPhones: How to Get Rid of Them
If you’ve come to this page because you are worried that the FBI or any other law enforcement agency is threatening you with arrest through your web browser, PLEASE read this entire article carefully. These types of “warnings” are scams meant to prey upon your fears. Law enforcement does not demand fines through web pop-ups (and there is no technology that would allow them to do so even if they wanted to). So read on and relax – you are not going to be arrested because of these scam messages. I assure you, even if you think the warning looks real or is somewhat different than the warnings I describe in the article, they are, in fact, all scams.
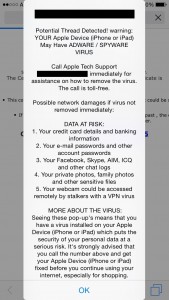
A previous article I had written a couple of years ago about an “FBI” phishing scam affecting Mac computers continues to receive a lot of attention. Additionally, I also get a lot of questions about getting rid of scam pages that can pop up on Macs from another article I wrote. Gradually, the questions being asked are more often about these types of scam pages showing up on iPhones or iPads. Some scam pages are easy to ignore and close out. However, increasingly scammers are creating fake warning messages that seem to continually return even if we tap the OK button many times. As long as that fake warning message is showing up on our screen, we can not use Safari and browse the web. A lot of people get freaked out that the fake warning messages might actually be real since they can not seem to get rid of them. Or they believe that their iPhone or iPad is infected with some sort of virus or malware and start to panic. While it can be a little tricky to close out these scam pages on an iPhone, I have come up with a solution that is fairly simple to perform.
- First, keep in mind that whatever the dire warning says, it is a scam. Ignore the message and move on to getting rid of it. NEVER call any phone numbers displayed when you see a scam like this, even if they say they are from Apple, Microsoft, or any other well-known company.
- Additionally, your iPhone, iPad, or iPod Touch is NOT infected with any sort of virus or malware. There are NO known viruses or malwares that can infect an iPhone, iPad or iPod Touch. So you DO NOT need to overreact and do things like wiping out your device or restoring from a backup.
- When you are confronted with a scam warning that you can’t seem to get rid of, push the home button on your iPhone to go back to the home screen.
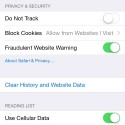
- Open the Settings app and scroll down until you see Safari. Tap on Safari and then scroll down until you see Advanced.
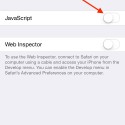
- Tap on Advanced and you should see an option called JavaScript.
- Turn off JavaScript (make sure it is NOT green) and then double-click the home button to pull up your recently used apps.
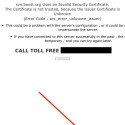
- Safari should be the first app listed. If not, scroll over until you see it. Tap on Safari to open it. You will need to click OK on the fake warning message once or twice more. The warning should now go away and you should be left with the underlying scam page.
- Tap the “tabs” icon in the lower right corner of the Safari window (it looks like two squares, one on top of the other). If you don’t see the tabs icon, scroll up until you see it appear. Tapping the tabs icon will bring up a screen of all your open web pages and possibly a list of open web pages on your other devices.
- The scam page should be at the bottom of all your open web pages. Tap the small “x” icon on the left side of the scam page and that should close it out. Now double-click the home button again. Look for the Settings app and tap it. Turn JavaScript back on (make it green). Now you can return to browsing with Safari again.
- The Safari settings screen
- Turn off JavaScript in the Advanced Safari settings
- When you see the underlying scam page, tap the “tabs” icon in the lower right corner
- Finally, you can kill the scam page by tapping its corresponding “x’ icon.
Once again, the key thing to keep in mind is that regardless of the nature of the scam (FBI warning, virus warning, etc.) they are in fact ONLY scams. The FBI (or other law enforcement agency) is NOT going to contact you through a web pop-up and there are NO known malwares that have ever affected the iPhone or iPad. Fear is the scammers’ weapon. So calm down and continue on with your day!
If you have any questions about scam pages or any other technology-related topic, please post your question on my new Question & Answer forum on my web site! Your questions may help other people find answers to their technology problems as well.
Update: Even if a scam web page tells you where you are located or shows you an IP address, this does NOT mean it is law enforcement. It is simple to code a web page that can query your IP address and there are public databases available that correlate IP addresses of Internet providers with physical location. This is simply a smoke-and-mirrors trick to scare you into thinking someone is tracking you. Do not play into their game by being afraid.
Is Your Internet Speed Not What it Should Be? How to Test and Isolate the Problem

Step 1: Don’t Troubleshoot Yet
The first thing to do is verify that your router can handle the Internet speed that you are being offered. Read my previous article about high speed Internet and routers for more details. The bottom line is that if your router is not capable of handling the bandwidth of the newer high speed services being offered, then all the troubleshooting in the world isn’t going to help you. Likely if your router is more than a couple of years old, you should look into replacing it. But if you have a capable router, then you can proceed with troubleshooting.
Step 2: Understand What You’re Getting Yourself Into
The key to troubleshooting a complex system is isolating the cause or causes of the problem through a process of elimination. This is true of a network connected to the Internet, such as you have in your home or business. The problem could be with your ISP’s service, the ISP’s modem, your router, some sort of wireless interference, or a computer on your network may be eating up a large amount of bandwidth. The only way to figure out where the problem lies is by testing each point in the system as methodically as possible.
You will also need to know how to configure your router. This is usually done with a web-based administration interface or configuration software. The details will be different for every type of router and if you do not know how to configure your router, you will need to consult your manual or look it up online. The details of configuring a router are well beyond the scope of this article but they are very important so you will need to familiarize yourself with them or else call a professional to help you troubleshoot.
If after reading this article you feel overwhelmed, I don’t blame you! Don’t feel bad if you would rather have a qualified technology professional do this troubleshooting for you. It can be tricky and time consuming to isolate the problem with an Internet connection.
Step 3: Prepare Yourself
The first thing you will need is a tool to test the throughput of your Internet connection. It’s one thing to think your connection is slow, it’s another to prove it. For testing an Internet connection, it is best to use a traditional personal computer, such as a Windows PC or an Apple Macintosh. It is also best to use one that has an Ethernet port as well as wireless networking so that you can compare the results later on in the process. Ideally, you will test with more than one computer in order to isolate the computer itself as the source of a problem. If you are using a Windows PC, you must ensure that the computer is free of all malware because malware can often interfere with your computer’s operation and skew the results of bandwidth testing. Similarly, regardless of the type of computer you are using, make sure it is functioning properly across the board. If your Mac or PC has a lack of RAM, or if it is old and the hard drive is failing, or if it is suffering from any sort of problem, your testing results may not be accurate. If you are not sure your computer is malware free or otherwise operating correctly, consult with your trusted technology professional to have your computers worked on.
Once you have a suitable computer for testing, you will need a way to actually measure the throughput your can put across your network. There are many speed test web sites on the Internet that can do this for you. Since I personally have Charter Internet and many of my clients in the area do as well, I tend to use Charter’s Speed Test site. Even though it is run by an ISP, I have found that the results are accurate, even when running from other Internet Services. I like Charter’s Speed Test site because it is extremely simple and has no ads or other junk on the page. However, in the case that Charter’s Speed Test isn’t accurate where you live, I also use another site called Speakeasy Speed Test and on occasion to verify that I’m seeing consistent results, I also use Speedtest.net (although I don’t like the types of ads they run on that site, especially the ads for computer “cleaners” such as MacKeeper – stay away from that software).
Now that you have a computer with a wired Ethernet port ready and know which speed tests you are going to run we can begin with the actual troubleshooting process. Note that the process I’m going to detail is for Internet connections where you have a “modem” from the ISP and your own separate router device (a very common scenario for cable Internet services). If you have a service where your Internet device is a combination modem and router, then you have fewer devices to isolate. Where my instructions specify a modem and router, just know that you have only one device and modify your procedure accordingly. That being said, the combination modem/routers that ISPs provide are often low-end devices and may not provide great performance. Consider replacing your ISP-provided combination modem/router with a separate router if feasible.
Step 4: Establish a Baseline
Begin by running a few speed tests and getting a baseline speed. It does no good to start troubleshooting if you don’t know what speeds you had initially. After running the speed tests (ideally from at least a couple of different computers), take a minute to review your results. It may be possible that you are not getting as slow of speeds as you thought you were or perhaps only one computer is showing slow results. Consider the results of your baseline testing before going on to the next steps as you may not need to proceed with more in-depth testing just yet.
Step 5: Power Cycle your Network Equipment
Once you’ve run the speed test and have reviewed your results, go ahead and unplug power from both your router and your modem. Wait about 10 seconds or so before powering up your modem first. Wait about a minute or two before powering back up your router. This sequence is a little nitpicky but in general is the best way to ensure that your Internet connection comes online properly. Wait another minute or two after powering up your router and then perform the speed tests again. What we are trying to find out is if restarting your devices helps your Internet speed. If your speed is much better after restarting your devices, then stop the troubleshooting process here for the time being. Run periodic speed tests to see when and if your Internet speed drops. If your speed does drop again in the near future, repeat the power cycling process once again. Basically, if restarting your devices helps your connection for a day or two (or longer), it may be indicative of issues with one or both of those devices. They may be malfunctioning and you can proceed with further troubleshooting. However, before moving on with troubleshooting, make sure you purchase an uninterruptible power supply (UPS for short), also known as a battery backup, to use with your Internet modem and router. Sometimes power issues are a direct cause of problems for Internet services and using a UPS will help ensure that your devices are receiving clean power all the time. I have seen the use of a UPS eliminate Internet problems, including slow connections for many of my clients.
Step 6: Isolate Your ISP Modem
First test the ISP connection by itself. In other words, you will need to connect a computer by wired Ethernet directly to the ISP’s modem. As I mentioned above, you will want to make sure you are connecting a computer that is reasonably well performing and not burdened by malware. If you get the speed your ISP is providing to you or really close to it, then the problem is probably not with the ISP service or their modem. Go on to Step 7. But if you are still getting slow connection speed, test with another computer to make sure that your first computer isn’t the problem. Then if you are still getting slow results, you should call your ISP and have them test the connection and/or replace your modem.
Step 7: Isolate your Router
If the speed coming directly from your ISP’s modem is where it should be, the next step is to do isolation testing on your router. I recommend turning off the wireless connection for this test, so that any wireless devices do not connect to your router while you are testing it. Alternately, you can change the name of the wireless network and/or password so that any devices that were connecting to it can no longer do so. Reconnect your router to the ISP modem (you may possibly need to restart your modem first). Connect the same computer that you used earlier using wired Ethernet so that you can compare the same computer’s results. If your router is working properly with wired networking, then you should see nearly the same speed you saw when directly connecting to the ISP modem. However, if you have been careful to make sure that no other devices are connected to the router (either wired or wireless) and you are not getting the same speed when testing through the router, then the culprit is likely your router. If this is the case, you may want to try factory reseting your router to eliminate the possibility of a corrupted configuration mucking things up. Additionally check to see if you can upgrade your router’s firmware, as often new firmwares offer performance fixes with certain scenarios and loading/reloading firmware can sometimes fix a glitchy router. These steps serve to eliminate “soft” problems and help confirm that your router has a hardware malfunction. If your router has a hardware malfunction, then go buy a new router. See my previous article for some advice on what kind of router to purchase.
Step 8: Test your Wireless Networking
If your router gets good speed while testing it with an isolated wired connection, then you will need to test the wireless function. You can try shutting down all wireless devices you have in the house (which sometimes is hard given how many smartphones and mobile devices we all have) or you can simply change the wireless network name/and or password so that all those devices can no longer connect. If you can use the same computer you used for the wired testing, that is good since you will be able to compare direct results. But if you can’t, then once again make sure your new wireless device is reasonably well performing and free of malware.
Start by testing in the same room as your wireless router. If your speed is immediately slower than it was with wired testing, then either the wireless part of the router is malfunctioning or you have a wireless interference issue. Again, you may want to factory reset and/or upgrade the firmware of the router to be sure. However, it is possible that the issue is with the device you are testing with. Try testing with another computer to be sure.
If you have a wireless interference issue, these can be very hard to resolve. The good news is that most interference issues are with the 2.4 Ghz frequency range and the newer 5.4 Ghz frequency range doesn’t seem to suffer from as much interference. So if you have an older wireless router that only supports 2.4 Ghz, upgrading to a newer router with 5.4 Ghz capability may help out. It may also be possible to turn off your 2.4 Ghz radios and only use 5.4 Ghz. Unfortunately, many older and less expensive computers may only support 2.4 Ghz. So all you can do is test various configurations and see if there is any improvement. In crowded areas such as apartment buildings, there may not be much you can do at all. You can Google “resolving wi-fi interference” to find more information.
If your speed tests well, then your wireless router probably isn’t malfunctioning. Move further away from the router and test again. This procedure begins to determine if the range of your wireless network is an issue. Perform subsequent tests from various areas of your house that you frequent. If you begin to see poor speed results the further you move away from your router, or if certain areas seem to be dead spots, then you may need to move your router to a different location in the house, or look into installing additional wireless access points or wireless repeaters.
Step 9: What Now?
If you’ve gotten this far and the connection tests well, then the problem may be with a computer on your network. It may be infected with malware or someone is running a file-sharing software on their computer that is using excessive bandwidth. Also, it may be that someone in the neighborhood has your wireless password and is using your service without your knowledge (you do have a password-protected wireless network, right?). All you can do is try reconnecting computers/devices one at a time, and then testing again (from the same computer as before, if possible). You may want to wait 5 or 10 minutes in between connecting devices before testing. This gives them enough time to boot up and start the process that will begin exhibiting the symptoms. Obviously if you have any wired devices, you simply need to plug them in. With wireless devices, since you have changed the wireless network name and/or password, you can simply enter the new information into each device as you go along. Obviously, at any point if you are doing a speed test and find that the speed has dropped, then the last device you connected is probably the culprit. Disconnect it and retest to be sure. If you end up reconnecting all your devices (don’t forget things like your smartTV or video game consoles) and your speed test is still good, then it is possible someone else was tapping into your network. Make sure you keep your wireless password secure.
This is WAY Too Much Work!
If you think troubleshooting a slow Internet connection is too much work, I completely understand! Sometimes even I have difficulty nailing down a difficult network issue. Wireless networking can be as much of an art as a science and most people simply don’t have the time to learn the intricacies of networking, radio waves, and computer troubleshooting just to make their Internet speed faster. So if taking all these steps is just too much for you, don’t feel bad about calling in for some professional help. Oftentimes, a professional like myself can recognize when to shortcut certain steps or simply have a hunch about what the core issue is so we can get to a resolution faster. Bottom line, it may be worth paying someone to get to a resolution than to spend hours or days trying to figure it out yourself.
If you have any questions about troubleshooting a slow Internet connection, or any questions about technology, please ask them on my new Q&A forum on my web site!


